Happy bank holiday Monday all! It’s been raining all day here so I’ve been staying cosy in my kitchen with my trusty oven, apron and radio on all day. Bliss!
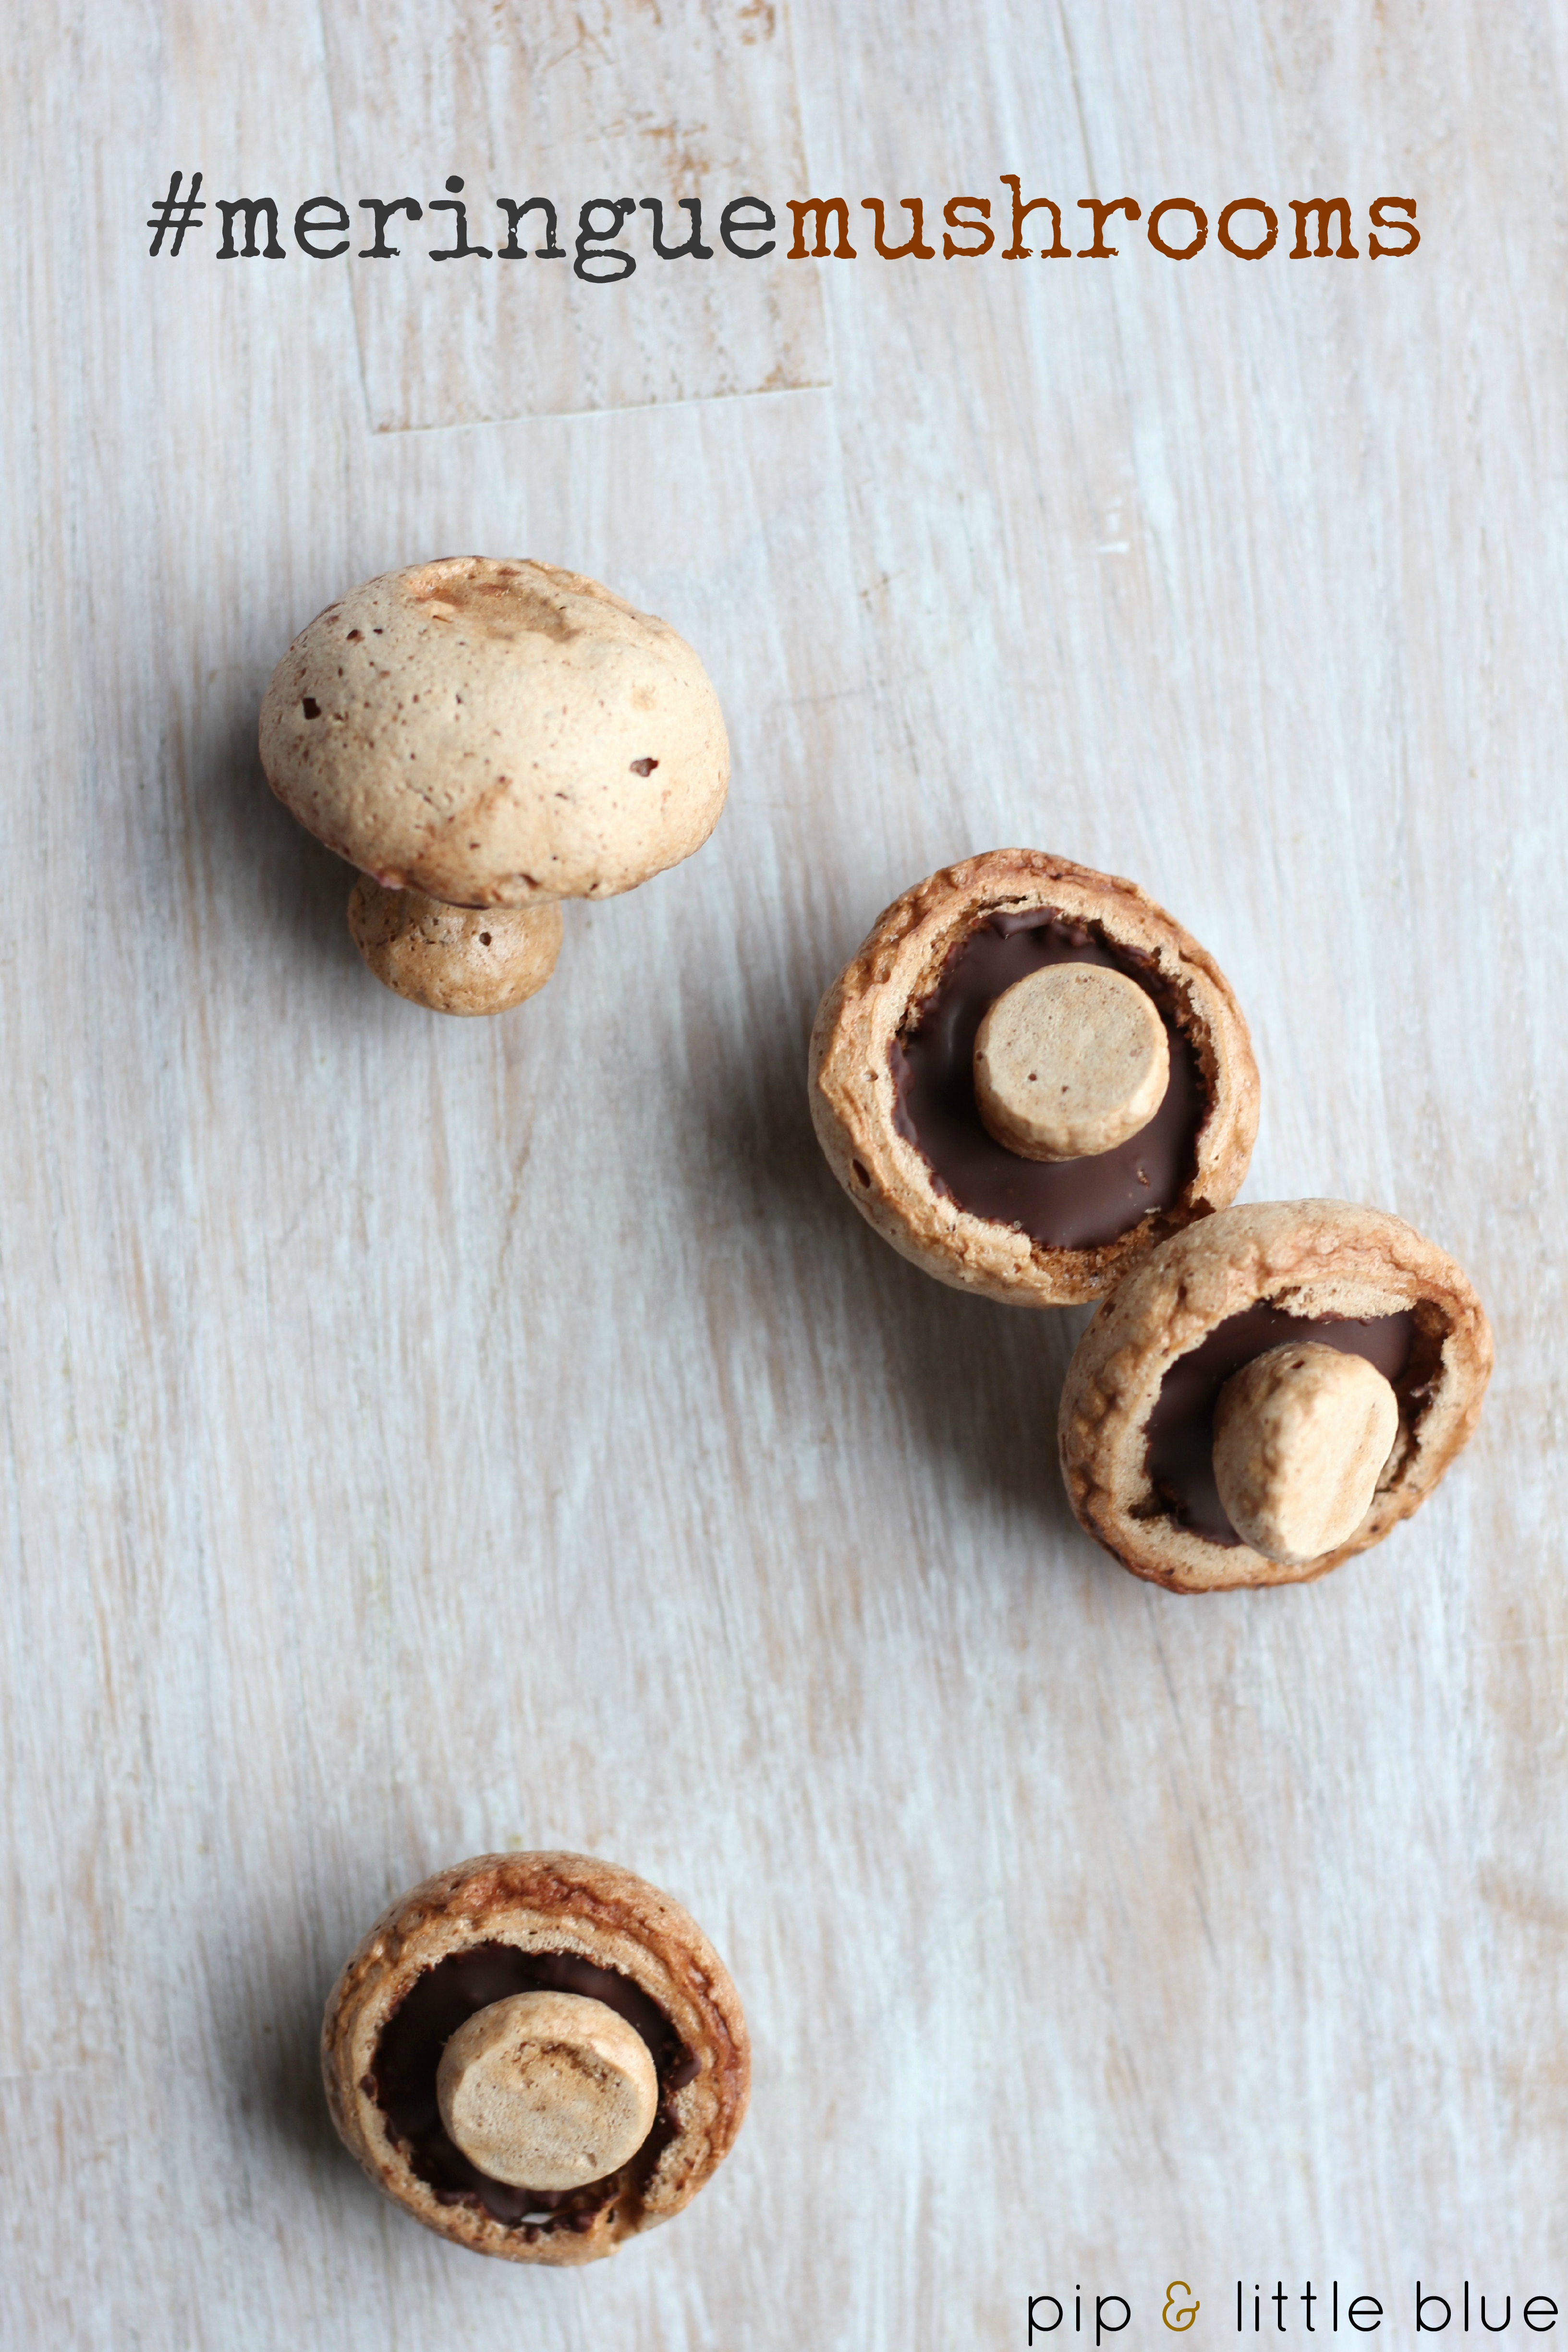
So today I made meringue mushrooms. I don’t normally go in for fiddly when it comes to baking and decorating but I couldn’t resist making these little beauties after seeing all the fancy-pants meringue work going on in the Great British Bake Off tent last week. I have used mine to top a cake but you could also package them up into little bundles and give them as quirky edible gifts. I personally think that would be very cool. The result is pretty life-like and sure to impress – particularly, if like with mine, your stems come out a bit wibbly and your caps are an assortment of slightly different sizes…this is one of those times where inconsistency pays off!
Made using a basic (French) meringue, the only fiddly bits are the piping and the assembly and neither are very difficult at all once you’ve had a bit of practice. These fun sweet treats are extremely gratifying to make and any leftovers (or rejects in my case…) can be lobbed into an impromptu Eton mess – result.
Gluten-free, dairy-free and refined-sugar free. And yet still so delicious…
Let me know what you think!

Chocolate meringue mushrooms
Ingredients:
Makes 20-30 mushrooms, depending on size
- 80g egg white or 2 large egg whites
- 100g golden caster sugar
- pinch salt
- 1 teaspoon cocoa powder, optional (plus extra for dusting)
- 40g dark chocolate*, cut into small pieces
*Be sure to check your chocolate is dairy-free if you’re making a DF version.

Method:
Preheat the oven to 140°C and line two baking trays with baking paper.
With an electric mixer using the whisk attachment on a medium speed, whisk the egg whites until soft peaks form (a minute or so past the foamy stage) and you can tip the bowl upside down without the mixture tumbling out. Tip: Make sure your mixing bowl is perfectly clean and perfectly dry – fat and moisture will ruin all prospects of a meringue.
With the mixer still running, gradually add the sugar and salt. Turn the mixer up to maximum speed and continue whisking until the meringue is stiff and glossy, and all the sugar has dissolved. Tip: This will take a good few minutes (over five) – you can test whether the sugar has dissolved by rubbing a little mixture between your fingers. If it’s grainy, keep whisking!
Briefly whisk in the cocoa powder, if using. Tip: This adds a slightly chestnut mushroom-y colour but if you prefer your ‘shrooms whiter, feel free to leave it out.
Immediately transfer the mixture to a piping bag with a 1cm-diameter plain nozzle. Starting with the stems, hold your piping bag vertical about 1cm from the tray and pipe long, upright ‘kisses’ about 3cm long. Finish by pulling upwards sharply. For the caps, keep your piping bag vertical and about 2cm from the tray – pipe the discs by squeezing continuously without moving the tip until the top of the disc reaches the height of the tip. Finish by twisting sideways sharply. Tip: Don’t worry if some of your stems droop a little – it makes them look realistically imperfect!
Gently flatten the wisp of each cap with a damp finger. Lightly dust with cocoa powder and then blow away the excess for truly ‘dirty’-looking mushrooms.

Bake for about 1hr until dry, rotating the position of the trays in the oven half way through. Tip: If they are dry, they should come away easily from the paper. If they are very stuck, continue to bake for another 10 minutes.
As the meringues cool, chop the top of each stem off with a sharp knife to create a flat top.
Place the chocolate pieces in a microwaveable bowl and heat on full power for 30 seconds. Remove and stir until the chocolate has fully melted. Repeat if necessary.
With a teaspoon, gently coat the underside of each cap with chocolate and allow to set for a few minutes. Then place a stem onto each cap and leave upside-down to set for about an hour. Tip: Don’t worry if the underside of your caps cave in – a lot of mine did and it makes them look even more like mushrooms – hurrah!

Source: Recipe and photos by pip & little blue.

I realized this year when I made these AGAIN that this recipe is 9 years old! I’ve made these almost every year since you posted this recipe. It’s a crowd pleaser, everyone always has such fun reactions to seeing these. I hosted a cookie swap party over the weekend and had these out – they were such a huge hit! I especially love that your recipe includes cocoa powder in the meringue because that really does make them look more realistic.
I must make this for a fairy-themed birthday cake I will present in 3 days. Can I make them ahead? Will they keep?
Pingback: POLKADOT MUSHROOM CHOCOLATE
Pingback: 10 Edible Gift Ideas That Aren’t Cookies | So Munch Love
Pingback: Top 5 gluten-free Christmas gift recipes | pip & little blue
These are so beautiful! I have to come up with an excuse to make them! A pinterest link to the coffee fudge recipe brought me to your blog, and I am so glad to have discovered it. I have been devouring your posts all morning :)
Warmest wishes from Texas!
What a lovely lovely comment – thank you so much and glad you are enjoying the blog! Equally warm wishes from very foggy London :)
Pingback: Black Forest gateau with meringue mushrooms (GF!) | pip & little blue
This is just amazing! I totally had to look twice to realise!
Haha everyone is saying that! Thanks so much :)
These are amazing, I have never seen such realistic mushroom meringues! I really love edible follies, and now I have to think of some excuse to make them…
Thanks so much – they were great fun to make! Isn’t a rainy day excuse enough?!
I had to have a double take they look real. Fab idea.
http://pinkiebag.com/
Thanks so much!
Absolutely extraordinary! I thought they were real! X